James Antonio
All kinds of accounting-related blogs.
Feature-rich accounting software is the basic requirement of businesses to compete with one another. Intuit provides that software suffice the accounting needs. They offer two products i.e., QuickBooks Desktop and QuickBooks Online to help manage the complete expenses with enhanced accounting benefits.
With the increased demand for strong accounting concerning large businesses, QuickBooks provides a variety of features to improve scalability. The data of bulk credit card transactions can be managed with the help of various software and the data file can also be easily imported into QuickBooks.
The trial version of one of the desktop software can be downloaded from the Dancing Numbers website which extends its support for QuickBooks Pro, Enterprise, Premier, and Accountant Editions.
This software allows to import credit card transactions into QuickBooks Desktop easily.
To help in importing the file data to QuickBooks, Dancing Numbers allows an easy yet efficient process. Let us follow the steps below: -
*To import the file data of credit card transactions into QuickBooks Online (QBO). Let us follow the below steps: -
*
*Or set up the mapping of the transactions. It can be done as follows: -
*
Here, the process of importing the credit card transactions to QuickBooks Online is completed.
Note: The QuickBooks can handle only 3-column or 4-column format. So, before uploading the credit card statement file to QuickBooks Online, the downloaded file from the bank should be formatted correctly.
Also, checking the file size should be considered and it should be within the supported range of up to 350 KB. And to keep it at optimal value, the transactions should be downloaded in small batches.
Following the discussed process, the importing of credit card transactions to QuickBooks Desktop (QBDT) and QuickBooks Online (QBO) can be done with ease and effectiveness. In case, you encounter any issue with the above steps, you can get the suggestions, required video tutorials, and help from the QuickBooks website. It will provide convenience and support for using the software efficiently.
QuickBooks might be one of the most sophisticated and popular business accounting software at the present and the application which rules the space of business utilities in the virtual world, but it certainly cannot counter or replace all the nitty-gritty of the business that takes place in the real world. One of the harsh realities for business owners is bad debt. Occasionally when an organization has done everything they possibly could to get their payments back and remained unsuccessful in doing so, then they have to write them off as debts.
This blog will guide you in getting bad debt off the back of your financial accounting software by giving you step-by-step information about how to write off bad debt in QuickBooks.
Bad debt is the amount that a company or business fails to recover because the person, group, or company that has taken the debt cannot pay the debt for some reason or has gone bankrupt. When you are reconciling the accounts in QuickBooks, then issues related to debt can have consequences on the profit and loss reports as well as sales and income statements of a company.
There are some businesses such as that of finance companies where sales are made on credits and there is a need to have a separate bad debt account. When bad debts are written off in QuickBooks only then will the invoices get cleared from the account receivables and you will get the accurate profit amount in QuickBooks.
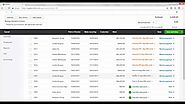
Step 1-Examining the Account Receivables Aging Report
Use the Accounts receivable Ageing Details report to check the receivables or invoices which are bad debt. For this follow these steps-
Step 2- Creating a Bad Debt Account
Step 3 - Setting up a bad debit item
Step 4- Creating a credit memo
Step 5 - Implementing the Credit Memo to an Invoice
Step 6 –Running a bad debts report
An Account Quick Report can be executed to review the receivables tagged as a bad debt.
We hope that using the information and the resolution mentioned above, a bad debt account can be set up in QuickBooks, reports could be run efficiently and all the bad debts and unpaid invoices can be easily viewed. You may now continue to successfully run your business without fiscal disparities caused by bad debts.
Source: Dancing Numbers
FAQs
Q. How to run a bad debt report on QuickBooks?
A. A bad debt report can be run by clicking Chart of accounts, then searching for Bad debt, and clicking run report.
Q. How can tell from a bad debt entity from other customers?
A. You can add a note to the customer’s name by selecting customers from the sales menu, choosing the customer’s name, editing it, and entering “Bad debt “or “No credit “ in the Display name as a field.
With explanatory steps, this article will help you to learn how to recover deleted invoices in QuickBooks.
Here users can learn steps to Delete an Invoice in QuickBooks Online. Invoices are generally issued to the customer in case the customers require an extended period of payment.
In article we have discussed about QuickBooks 2022 Release; QuickBooks Desktop 2022 Moves to Subscription only Mode. Know about complete information about QuickBooks Desktop 2022 Launching.
Here you can get complete information about your question Record Returned or Bounced Check in QuickBooks Desktop & Online. Also learn About Enter a Bounced Checks in QuickBooks Online Using Journal Entry.
Here you can learn how to import excel file into QuickBooks. You will need this option to import customer, vendor items, payroll list, and transactions from time to time.
This article will help you to guide on how to import your accountant's changes into your company file in QuickBooks Desktop.
Timesheets are used to store employees' hours of working and creating paychecks. Users can also use it to create customer's invoices. Hence it's important to import timesheets entries into QuickBooks for better management of employee payroll. So let's find out how to import timesheet entries into QuickBooks Desktop.
Learn how to delete a bank account in QuickBooks Desktop & Online. You will be having two options; the first one is obviously to delete a bank account permanently and the second being deactivated the account that comes with a later recovery option.
Know the steps to Importing custom Invoice Templates in QuickBooks Online. You can include details like company name and logo, this leaves long lasting impression on your customers and they will prefer you as a supplier.
In this article learn how to Convert From QuickBooks Desktop to QuickBooks Online, Convert and Migrate. Many users are using QuickBooks Desktop and while working they also need to move QuickBooks Desktop to QuickBooks Online.
You can easily Import Sales Tax Group Items from Excel to your QuickBooks Desktop directly through Dancing Numbers (Desktop).
Learn how to import CSV into QuickBooks Desktop. CSV files can be understood as simple text files which include vital tabular data and each of its fields is at a distance with a comma separating them.
In business, chart of accounts is very helpful for the accountants, since it helps in proper bookkeeping and efficient business functioning.
Cancel QuickBooks Payroll Service in QuickBooks Desktop; Occasionally, various scenarios occur, leading you to decide to cancel Subscriptions of products you use.
QuickBooks Update Error 1328 pops up when a user tries to update their QuickBooks Software. Let's learn how to resolve the error and get your s/w running again.
In this article learn Causes, Symptoms how to Resolving QuickBooks Desktop Install Errors, Problems, or Issues.
Learn how to add, enter or edit opening Balance in QuickBooks. henceforth track all of your company’s transactions.
These are some of the most prevalent causes of Unrecoverable Errors and the codes associated with them. The error number you receive may change from what is
How To Unfreeze QuickBooks Desktop Instantly; QuickBooks, despite its many features, functionality, and diversity, is not without faults or problems.
Here you learn how to fix QuickBooks is Unable to Send Emails to Outlook error. This problem generally arises while sending the invoices to clients over email via QuickBooks.
QuickBooks Error H202 occurs when we try to use QuickBooks in multi-user mode or the QuickBooks fails to open a company file that is stored on another system.
QuickBooks desktop 2021 upgrade is available to download and install into your system. The upgrade is important as it helps you to fix the problems that you are facing in your older version.
Here is the most advanced and simple software available which simply works for you. It is one of the best-automated software which imports the timesheet entries into QuickBooks Desktop with Dancing…

Dancing numbers is a platform where you can make your work easier with our services of importing, exporting, and deleting the data in your QuickBooks account easily. It helps you in saving your tim...