 BACKBEAT Band Forums
STOP! DON’T SHOOT THAT CRUMMY VIDEO!
Let me start by saying that I am simply a “regular person”, frustrated by many of the poor-quality fan videos found these days on YouTube. I love attending live music shows, shooting video, and posting it to YouTube for the bands themselves and others to share and enjoy.
I am still learning, but I would love to share with you the most valuable basic tips I have acquired through my own trial & error experience thus far as a non-professional shooting live music event videos:
Source: http://www.backbeatbandforums.com
If that is only a cellphone, then so be it. But if you want better footage and plan to record events regularly, you really should invest in some equipment that is going to help improve your videos. It doesn’t need to be the top-of-the-line stuff if your wallet is thin, but it should do the job you intend at least reasonably well. I started out small and cheap with a Canon FS20 8GB Digital Video Camcorder. I loved that little camera so much I later picked up another one used for only $50 because the outer casing was all scratched up, but works great otherwise. It has been an excellent backup camera! And yes, a GoPro HERO
would be SWEET, but I haven't made that leap yet, myself. But do I WANT one? Ohhhhh, yes! :)
Battery – charge it! And your High Speed Flash Memory Card
– don’t’ forget it at home! Yes, I’ve forgotten to do one or the other at times. But once you make that mistake it is such a let-down that you will NEVER do it again, I assure you. Another thing is making sure that you have enough battery and storage to cover whatever it is you are trying to record. When I upgraded to the Canon Vixia, I was able to get a larger capacity battery for it, and I can now easily record for a good 6 hours when needed.
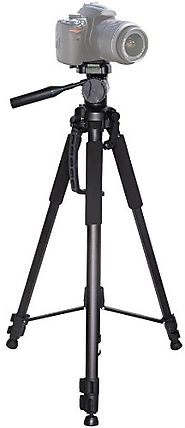
Hand-held videos can be great, but if you are going to be recording an entire set or an entire show for that matter, your arms will welcome a rest. Plus, you can frame your videos well and keep things nice and steady. An entry-level tripod such as the Professional 72-inch TRIPODfrom Amazon for example (I just purchased this one, myself), works exceptionally well when you are attempting to record a performance all by yourself using multiple cameras. Just set one camera up in the best spot you can find (be sure it will be safe from theft and careless dancers), and leave it in place for the entire show. You can then use a second hand-held camera (or a camera mounted on a monopod such as the Opteka MP100 67" Professional Heavy Duty Photo / Video Monopod
) to move around and get filler material such as close-ups, crowd reactions, and other unusual things that you think may add to the interest of your video.
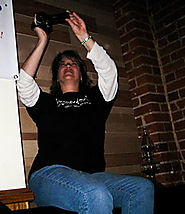
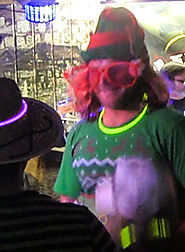
When you do end up having to hand-hold a video camera, be sure to hold it properly to avoid excessive camera shake (not necessarily the way I am holding it in the photo here, unless that is your only choice). Be sure to check out these excellent Handheld Camera Techniquesby the good folks at Videomaker.com. In addition, some cameras contain "stabilization" settings, so be sure to read your camera's user manual to find out more about that.
This is where the camera you choose can make or break you. A performance recorded on a cellphone may not come out too bad if held fairly still and done outside on a nice day where there is a lot of natural light. But since the majority of shows tend to be in the evening hours, we need to find ways to record without having to use the built-in video light or other additional lighting that could potentially disrupt the performance or ruin the ambiance of the stage lighting. Look for a camera that performs relatively well in low-light situations such as the consumer-level camcorder I use now, the Canon VIXIA HF M40 Full HD Camcorder with HD CMOS Pro. I LOVE this thing, and it does the job I expected in lower-light stage situations. A camera like this has a better CMOS chip which increases light sensitivity and will make all the difference between getting good, useable video versus dark, “what is that?” video. If other fans are recording with their everyday devices, it is highly likely that your video will be the best one out of the bunch, if only for that reason.
Familiarize yourself with the common “rule of thirds”, and do your best to compose interesting scenes. Beware of microphones, drum cymbals, and occlusive music stands that you may not even notice are blocking the performer’s face or instrument. Is there anything hanging on the wall that will appear intrusive or distracting? For example, I had a tripod set up to record our own band at a particular venue, and later noticed that the set of Texas long horn “horns” hanging on the wall seemed to sit perfectly upon the head of one of our band members. Yeah, that can ruin the whole look, haha. Another common issue is having the top of somebody’s head in your frame for the entire performance. It can be extremely distracting. You can edit it out later if needed, but cutting it out of your frame at the time of shooting can reduce your editing time dramatically later on!
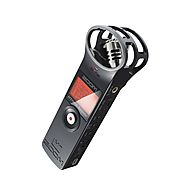
For best quality sound you could ask about recording through the band’s mixer. But most of us normal people aren’t going to be able to do that. Sure, you might get by with a cellphone for that quiet acoustic performance at a coffee shop, but with loud booming speaker mains and a full band, a cellphone isn’t gonna cut it. Most new cameras today seem to do surprisingly well at preventing their audio from being blown-out at these shows, and the sound quality can be pretty decent from some of them if your camera is positioned well. But for best sound you might wish to consider a better mic (often can be mounted directly to the camera), and this would also keep your audio synced up properly with your video. You could also record separately via something like the Zoom H1 Handy Portable Digital Recorder. That's the one I use when needed, and it works well. The problem with having separate audio and video files is that it not only eats up more storage space, but also takes an incredible amount of time to sync up during the editing process. For the most balanced sound, try to position yourself the best you can so all speakers are equal distance to the camera. If you try to record off to one side of the stage, you might be standing right in front of the guitarist’s amp and that is all you will hear. Try to keep it balanced whenever you can. Also, try to record up closer to the band rather than from further back in the middle of the crowd. That way the sound of the band drowns out much of the individual chatter. When you record further back, you will pick up every single conversation that’s around you and just hear the band in the background. Whether that’s a good thing or a bad thing is for you to decide. Other things that I have found that can wreck your audio are little things like repositioning a tripod, dragging a monopod foot along the ground, changing your hand position or fussing with settings while holding the camera, or well-meaning but oblivious people who attempt to converse with you while recording. Hint: stay up front where it’s too loud for “anyone” to try to talk to you over the band! ;)
Even if you are only recording the show with a single camera, you can still walk around before/after the show or between sets to catch other relevant things to include later in your video such as crowd reactions, dancing, the front of the venue, the surrounding décor, or anything else that may seem fitting. Shoot anything and everything. You never know what you might be able to use.
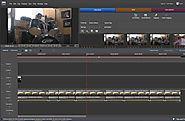
That’s fine if all you want to do is shoot a one-camera video the best you can and then post it to YouTube. But at least learn to add a title and fade in/out segments for a more polished look. You can sometimes accomplish this by using software that was included along with the camera you purchased, but short of that, YouTube has some basic video editing tools, as well. I don’t recommend using their “Stabilize” feature though… as it can strangely distort your video in certain places and make it worse. There are plenty of other little editing tools out there, and many are free… so just be sure to pick the one you find to be most intuitive and easy to learn. For those of you who would like to get more heavily into editing, there is always FinalCut Pro, or the program that I initially learned on Adobe Premiere Elements 13, and others. These programs have a steeper learning-curve, but they are much more powerful in what they can accomplish. It all depends on how involved you want to get.

Forum topics and more for the gigging musician! Also free classified ads, regularly featured blog, free event listings, and online music store. http://www.backbeatbandforums.com