 GOAT Series Staff
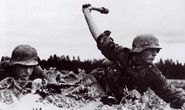
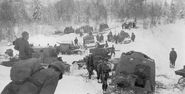
Anybody who has taken an introductory course in history knows that conquerors would do well to avoid Russia. With unforgiving weather, punishing winters, and enormous amounts of manpower, Russia is the ultimate hurdle for invading forces. This fact, however, was ignored when Adolf Hitler broke his own pact and initiated Operation Barbarossa (which was opposed by his staff). A massive force of infantry, armored units, and aircraft descended on the Soviet Union’s territory, but as the operation slid into winter and beyond, it became clear that the Nazis were not prepared for a protracted invasion, and their troops were not ready for the extreme conditions of the front. Operation Barbarossa would later result in the organized retreat of German forces from Russia, and would live on in the immortal mistake of provoking the Soviet Union.
Date: 1941 | Location: Western Soviet territory | Overarching Conflict: World War Two | Factions Involved: Nazi Germany and its satellite countries against the Soviet Union | Troop Numbers: 3.8 million German soldiers, 5.5 million Russian soldiers
Critical Error: Lack of long-term strategy and troop sustainability efforts | Casualties: 800,000+ German losses, 4+ million Russian losses | Result: German seizure of significant portions of Russia, but overall failure to claim Leningrand and other tactical landmarks.
World War One is often cited as one of the bloodiest wars in human history, and The Battle of the Somme does not conflict with this image. In the early stages of the war, British and French troops attempted to push back against German forces at the Somme river, where both factions were able to set up entrenched positions and employ the mechanized tank in its earliest form. Many of the troops, particularly on the British side, had not received enough training to be in frontline combat, and were confused or disoriented when forced to restructure themselves in the middle of the fighting. Conditions were horrid, progress was minimal, and the casualty rates only increased as the months slipped past. The British command was far from prepared to take action, but urging from their French allies ultimately thrust them into the fighting, which resulted in disastrous disorganization and outdated military tactics.
Date: 1916 | Location: Somme River, Pas-de-Calais, France | Overarching Conflict: World War One | Factions Involved: British Empire (Britain, Australia, India, Canada, New Zealand) and France against the German Empire | Troop Numbers: (At battle's height) 51 British, 48 French divisions, 50 German divisions
Critical Error: Failure to train soldiers properly, especially regarding the breakdown of command | Casualties: 623,907 British and French losses, between 237,000 and 500,000 German losses | Result: 6 miles of territorial gains for British and French troops
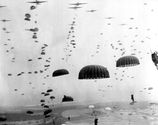
At the height of the Cold War, the relationship between Cuba and the United States was more frayed and uneasy than ever. The CIA proposed a military invasion to President Kennedy, and after being green-lit, the Intelligence Agency devised a plan relying on American aerial support and combat training for Cuban exiles. After an initial bombing run on Cuban airfields, the US-trained militants traveled from Guatemala to their landing site in Cuba, where they found initial success but were soon defeated. Most of the captured exiles were interrogated and then returned to the United States. The CIA blamed this failure on overextension of supplies, failure to ensure aid from Cuban resistance fighters, insufficient secondary planning, and a host of other problems. Prime Minister Fidel Castro struck back by forming stronger ties with the Soviet Union, which would later result in the Cuban Missile Crisis.
Date: 1961 | Location: Bay of Pigs, Cuba | Overarching Conflict: Cold War | Factions Involved: Cuba against America | Troop Numbers: 1,500 CIA-backed forces against 234,000 Cuban soldiers, militia, and police
Critical Error: CIA failure to provide munitions, logistical aid, and tactical support to ground forces | Casualties: 4,176 Cuban forces killed, 118 CIA-backed forces killed (1,202 captured) | Result: Further disintegration of Cuban-American relations and increases in Cold War tension
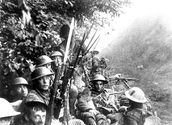
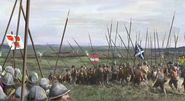
Although Russia may seem like the toughest hurdle for invading forces, there are other places that even Russia cannot conquer. Finland, which was invaded by the Soviet Union in the early stages of World War Two, proved to be the ultimate gauntlet for both the attackers and defenders. The snowy fields, forests, and hills of Finland were often protected by marksmen wearing white smocks, including the famed Simo Häyhä, who carries the highest recorded number of marksman kills in modern war. The resistance fighters and soldiers of Finland knew their terrain well, and were able to inflict massive casualties on Russian forces in spite of Soviet bombing and artillery blanketing. The Winter War ended with a treaty ceding portions of Finland to Russia, but the unmitigated losses and extreme effort of the war plagued Soviet tacticians for years.
Date: 1939 to 1940 | Location: Finland | Overarching Conflict: Soviet-Finnish Conflict | Factions Involved: Finland and Swedish volunteers against the Soviet Union | Troop Numbers: 250,000 to 340,000 Finnish soldiers against 998,100 Russian soldiers
Critical Error: Inadequate understanding of Finnish terrain and weather conditions | Casualties: 25,904 Finnish soldiers killed, 126,875 Russian soldiers killed | Result: Ceding of some Finnish territory to the Soviet Union, reforms for Soviet military tactics
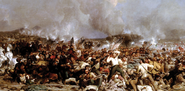
It had seemed nearly impossible for the Europeans to hold off the Islamic advance into Europe, but all it took was one decisive conflict to turn the tables of war. Charles Martel, a prominent Frankish commander, led his forces against the Umayyad Caliphate in the land between Tours and Poitiers, France, and was graced with some very peculiar advantages. The rumors throughout the Umayyad forces led to deep fears of Frankish raids, especially on the treasure hordes kept in the Umayyad camps. During the battle itself, multiple Umayyad divisions were either separated from the main host or broke away, leading to a domino effect of perceived surrender and retreats from the battlefield. Had the Umayyad commander analyzed the Frankish maneuvers, and moved his own forces accordingly, a blunder might have been avoided.
Date: 732 | Location: Tours and Poitiers, France | Overarching Conflict: Islamic Invasion of Gaul | Factions Involved: Merovingian Franks against the Umayyad Caliphate | Troop Numbers: 15,000 to 80,000 Frankish soldiers against 20,000 to 80,000 Umayyad soldiers
Critical Error: Umayyad failure to prevent withdrawal and retreat to the base camp | Casualties: 1,100 Frankish soldiers killed, 12,000 Umayyad soldiers killed | Result: Complete withdrawal of Umayyad forces from France
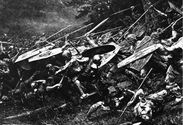
This battle should almost be labeled an ambush, if only to highlight the utter disarray and chaos of the engagement. With Roman troops operating in Germanic territory, a Roman-born man of Germanic origin named Arminius forged a secret alliance with the native populations and orchestrated an ambush within the forests of Teutoburg. Arminius advised Varus, the Roman commander, to take the legions XVII, XVIII/XIIX, and XIX/XVIIII through the forested hills of Lower Saxony. While marching, the Romans were ambushed by massive numbers of tribes – including the Cherusci and Chatti – who decimated their forces and forced them into a protracted retreat, where further ambushes waited within the woods. Varus committed suicide as a result of the overwhelming defeat, and the Emperor Augustus, upon hearing of the disappearance of the legionnaires, was noted to have struck his head against a palatial wall and cry for the return of his legions.
Date: 9 (AD) | Location: Lower Saxony, Germany | Overarching Conflict: Roman-Germanic Wars | Factions Involved: Germanic tribes against the Roman Empire | Troop Numbers: 12,000 to 32,000 Germanic soldiers against 20,000 to 36,000 Roman soldiers
Critical Error: Continuing to March into the ambushes constructed by Germanic troops and Arminius | Casualties: Unknown Germanic losses, 16,000 to 20,000 Roman losses | Result: Largest catastrophe in Roman military history, loss of three entire legions
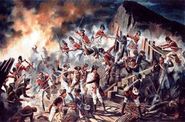
Since holding the high ground is considered a prime advantage in combat, holding the marshy low ground is, naturally, a crippling disadvantage. When the English forces made their final maneuvers and ended up in the mires, it seemed like a natural victory for the Scots, who also had superior forces and the presence of their king. Against all reason, however, the Scots sallied forth from their position and engaged the English in the marshes, which led to a swift reversal of morale and combat effectiveness. While the battle was descending into chaos, the Scottish king James IV was killed, further worsening the situation for the Scots and triggering a quick end to the conflict. In the aftermath of the battle, it was discovered that dozens of Scottish earls and clergymen had perished in the fighting.
Date: 1513 | Location: Northumberland, England | Overarching Conflict: War of the League of Cambrai | Factions Involved: Kingdom of England against Kingdom of Scotland | Troop Numbers: 26,000 English soldiers against 30,000 to 34,000 Scottish soldiers
Critical Error: Scottish troop maneuvering into marshy ground | Casualties: 1,500 English soldiers killed, 5,000 to 17,000 Scottish soldiers killed | Result: Death of the King of Scotland
A single mistake in a battle can have dire repercussions, as evidenced by the three-division charge orchestrated by Robert E. Lee during the Battle of Gettysburg. Although the charge was named after George Pickett, two other Confederate generals were involved in leading the maneuver. After an initial round of cannon fire, which Lee hoped would be effective in dismantling the Union lines, the three divisions advanced and were torn apart by waiting (and relatively unaffected) troops, who were able to concentrate their musket and artillery fire on the oncoming Confederates. The loss of these troops had a significant and demoralizing impact on the Confederate forces, which were later defeated in the battle. In later years, George Pickett said hardly anything about the failure of the assault, but his after-action report was damning enough to be ordered for burned by Robert E. Lee.
Date: 1863 | Location: Gettysburg, Pennsylvania | Overarching Conflict: American Civil War | Factions Involved: The Confederacy against the Union | Troop Numbers: 12,500 Confederate soldiers against unknown numbers of Union soldiers
Critical Error: Marching directly into Union lanes of fire, ignoring cannon and musket lines | Casualties: Loss of half of the charge's Confederate soldiers | Result: Crippled Confederacy morale and significant setbacks at Gettysburg
In situations where there are massive amounts of troops, coordinating battle groups is often more difficult than planning the actual strategy. This was the case at the Great Siege of Gibraltar, where the overwhelming force of the Spanish and French troops was unable to break the British defenses near the coast. Sorties – small, swift raids – made by the British against the Spanish were able to cripple many of their offensive actions, and simply aligning the extraordinary number of naval vessels in the Spanish fleet was next to impossible. The more vessels that were brought to bear, the more targets the British had with their rows of cannons and artillery emplacements. After the Great Siege, the Spanish never attempted to retake Gibraltar with naval vessels or infantry, and were also unsuccessful in diplomatic reclaiming attempts.
Date: 1779-1783 | Location: Gibraltar | Overarching Conflict: American Revolutionary War | Factions Involved: Britain against Spain and France | Troop Numbers: (At battle's height) 7,500 British soldiers against 63,000 Spanish and French soldiers, sailors, and marines
Critical Error: Loss of Spanish vessels during the famed "Grand Assault" | Casualties: 333 British soldiers killed, 6,000 Spanish and French soldiers killed | Result: Cessation of Spanish efforts to retake Gibraltar through force
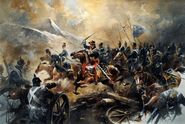
War poetry can be some of the most remembered material in literature, so it’s no surprise that the Charge of the Light Brigade has been well-remembered by the public and academics alike. Poet laureate Alfred Lord Tennyson’s masterpiece, which immortalized the light cavalry’s ill-fated charge against the Russian lines at the Battle of Balaclava, managed to capture the heroism and intensity of the riders, while also leveling severe criticism at the commanders who ordered the charge. In fact, the maneuver was a mistake from its inception, since the site of the assault was incorrectly relayed to the commander of the cavalry brigade. Because of an error in command, the light brigade assaulted a Russian line that easily destroyed their forces and wiped out significant numbers of the light brigade’s ranks.
Date: 1854 | Location: Balaclava, Crimea | Overarching Conflict: The Crimean War | Factions Involved: The United Kingdom and France against the Russian Empire | Troop Numbers: 670 British light cavalry against unknown numbers of Russian soldiers
Critical Error: Accidentally sending the brigade against a fully-manned and front-facing firing line | Casualties: 110 British cavalrymen killed, unknown Russian losses | Result: Extreme loss of light brigade personnel, lessened respect and trust in leadership
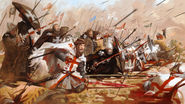
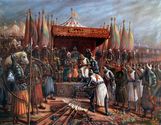
If there was ever any doubt that water is tantamount to gold in warfare, The Battle of Hattin should reaffirm the notion. In 1187, just before the Third Crusade for Jerusalem and the Holy Land, the Crusader forces were locked in combat with the Ayyubid Dynasty. These engagements came to a head when Saladin and his commanders managed to separate the Crusaders from their water source, leading to dehydration in such a scorching environment. Driven by extreme thirst and desperation, the Crusaders threw themselves at Saladin’s lines, only to be beaten back and pried apart during the course of the battle. After being captured, Saladin spared the top tier of commanders and executed the bulk of the fighting men, which effectively ended the crusading army’s existence. Saladin’s later acts of humiliation, such as sending an upside-down cross to Damascus, incensed the Christian forces enough to launch the Third Crusade.
Date: 1187 | Location: Modern-day Israel | Overarching Conflict: The Third Crusade | Factions Involved: Jerusalem, Antioch, the Knights Templar, the Knights Hospitalier, and the Order of Saint Lazarus against the Ayyubid Dynasty | Troop Numbers: 20,000 Crusader soldiers against 30,000 Ayyubid soldiers
Critical Error: Inability to secure a water source, which caused desperation and the collapse of order | Casualties: Unknown, but with far greater losses for Crusader forces | Result: Dissolution of the Kingdom of Jerusalem, Saladin's rampant conquest of Crusader cities